Creating Powtoons With POW!
Introduction – Who This Guide is For
Before you read anything else, I have to tell you that I do NOT work for Powtoon. Yes, they feature my videos and recommend me as a Powtoonist, but I do not pay for that privilege, nor do they pay me to endorse them.
I’m simply a guy who needed an animated video production tool and prefer Powtoon. They happened to like what I did with the software so that’s how I ended up with my videos and a link to my services on their site. Now back to our regular programming…
This guide is meant to help entrepreneurs with small to medium-sized businesses, especially people like me who are solo-preneurs, who like working under the hood and getting their hands dirty. This guide will help you get a quick head start on using Powtoon to create videos. But not just the generic DIY-looking Powtoon videos.
I’ve spent a lot of time creating Powtoons for myself and clients around the world and I’ve learned a few hacks and tricks that have helped me create what I call “Powtoons with Pow!”
In other words, this guide will help you make professional looking videos that look like they cost a pretty penny.
Why I Wrote This Guide (aka Why am I telling other people how to do it?)
Two reasons:
First, I’ve been creating free content since 2009 when I started making presentation tips videos. In fact, I owe everything I’m doing now to those videos, to the idea that giving away good value brings value back in return. Financially yes, but even more so the relationships and friendships that were created along the way. So I hope that by sharing these Powtoon tips with you, you will be able to create value for others and build your own relationships.
Second, I also learned that as an entrepreneur I can’t do it all. I’ve tried. I still try. I’m sure you’re in the same boat. But I’ve learned there are times when I need to rely on someone else. So perhaps down the road when you are looking for someone to help with your videos, you’ll think of me.
How to Use this Guide
This guide was written following my own workflow when creating videos. So you can follow each chapter and use it as a sequence of steps. First, I suggest going through each chapter and then using this guide as a checklist for when you make your own videos. As a bonus, I’ve included a Powtoon video production checklist at the end to help you out. (Don’t get too excited, it’s just the chapter rehashed into a list).
A BIG Secret to Tell You Before You Get Into the Guide
Now that you know who this guide is for, why I wrote it and how to use it, I want to share with you the big secret that has helped me create videos my clients are crazy about…
A video is just a presentation!
So above all else, remember that your video needs to focus on your audience, the message must be clear, it has to get and keep the audience’s attention and it must provide a clear call-to-action.
And now that you’re up to speed, let’s go!
Tip #1: Expectations – What Powtoon Is and What Powtoon Isn’t
A lot of people see fully animated explainer videos online and love them. Then those same people hope to get one of those videos made using Powtoon and are soon disappointed.
Yes, Powtoon can make some awesome videos, but you need to be realistic about your expectations so the following list of what Powtoon is and isn’t will help you understand what Powtoon can and can’t do, which is still a lot.
* Powtoon IS a simple to use animated video creation tool.
* Powtoon IS empowered with features and abilities to produce professional results that look like you spent thousands of dollars.
* Powtoon IS affordable and a great way to market your business using video.
* Powtoon IS, in my opinion, the fastest and easiest way to make animated videos.
* Powtoon ISN’T a full-featured animation tool like Adobe After Effects, meaning you can’t use Powtoon to make fully animated, cartoon-like videos that normally cost thousands of dollars per minute.
* Powtoon ISN’T an app you can use offline or on a mobile device. This means you have to use Powtoon while connected to the Internet.
* Powtoon ISN’T able to export a copy of your video so you can edit it with another Powtoon account or any other animation software.
* Powtoon ISN’T bug-free but it’s run by a group of people who really do care and are constantly working to improve it.
Tip #2: Script Writing Essentials

Before you do anything in Powtoon, you need to have a script to work from. The script is your sales and/or marketing copy so it’s critical to have this ready before you create your video.
The script is also what your voice actor will read from. Even if you decide not to get a voiceover, you’ll still want to keep your script conversational and avoid any unnecessary jargon or long, complicated sentences.
Make sure you put your audience, your target market, first. Who is your target market? What is their problem, pain or challenge? How do you solve their problem, relieve their pain or help them overcome their challenge?
Tip #3: How Long Should My Powtoon Be?
Once you have the outline of your script, you can now edit it to get to the length you want for your video.
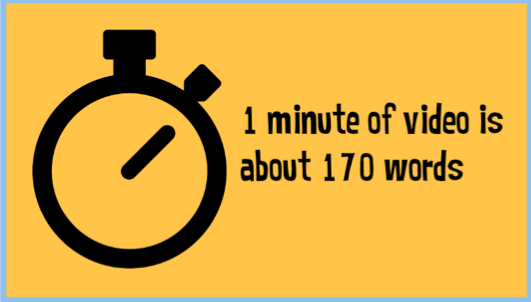
As a rough guide, a one minute video will have about 170 words. Ideally, your video should not be more than three minutes long. A minute and a half to two minutes is ideal.
If you have more to say, consider making separate videos to make a series. Also, nothing bores people more than long videos about your business unless you’re giving amazing value.
Tip #4: To Voice or Not to Voice?
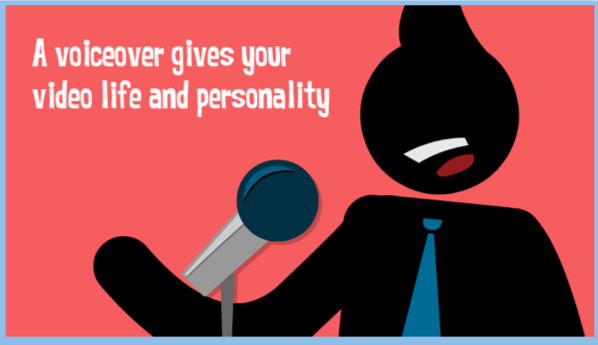
Voice! Always. A voiceover will give your video life and personality.
A voiceover over also gives your target market a sense of who you are, a feeling about whether you’re the type of people they want to do business with.
You can easily find voice actors for a reasonable cost on Fiverr.com. Usually, they charge $5 per minute or up to 100 words. Shop around as some are pricier, better, more reliable or good value.
For $5, you can afford to experiment.
Get an mp3 file in 320kbps to ensure quality audio and easy uploading to Powtoon. Powtoon only works with mp3 files.
Get a wav file if you plan to edit the audio further or want to archive an original copy of your voiceover. You can do the voiceover yourself but make sure you’re using a good microphone, are in a quiet, non-echoey room and
can sound enthusiastic and passionate. I do my own voiceovers because I work as a professional voice actor. Also because I have professional equipment and people know that I am my brand. Once imported into your
Powtoon, set the voiceover volume high enough so that you can hear it clearly when your speakers are turned up halfway.
Tip #5: Storyboard – Why & Basic Tips
You need to have a storyboard when you make a Powtoon because the storyboard acts as your video’s visual outline. It’s possible to make a video without a storyboard but it’s easier to make changes to a storyboard than to
a video that already has the timing, animations, transitions and everything set up. I create my storyboards in Powtoon because once the storyboard is finalized, it’s easy to upload my voiceover file, adjust the timing for
each scene and get the video completed. If you create the storyboard on paper or in another app, you will need to duplicate it in Powtoon. So why not save time and do the storyboard directly in Powtoon, right? When
putting together your storyboard in Powtoon, make each scene about 5-7 seconds long. This will give you plenty of time to make adjustments in the final video. This also makes it possible to have 3-5 scenes on one slide.
And finally, include the images, animations and transitions you intend to use, as well as the timing for when each element of your scene comes onto the screen. This will save you tons of time because you won’t have to do
all that after your storyboard is finished. This also helps you see what your completed video will look like and how things will work together.
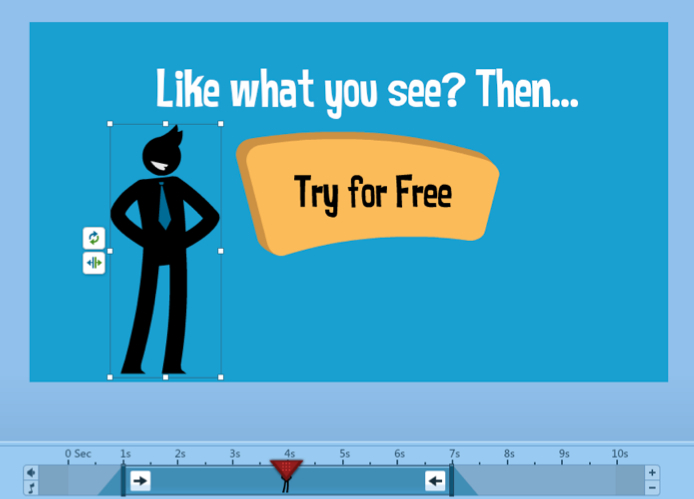
Tip #6: Size Matters – Creating Emotion with Size
An easy way to give emotion to your Powtoon video is to make things bigger when you want to show more emotion. You’ll often see this technique in movies when the director wants the audience to better experience what
a character is feeling. So if you want to show that your character is upset, you’ll get a much more powerful effect by zooming in on their face. This works with any of the Powtoon characters and all you have to do is resize
the character until all you mostly see is their head.

But don’t make all your characters zoomed in because the audience will get used to seeing that perspective and you’ll lose the effect. So don’t overdo it but definitely use it.
Tip #7: Transitions, Animations & Positions – Smooth Moves Create Flow
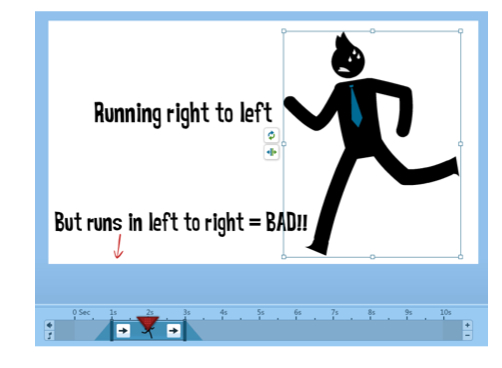
If there’s any one thing that separates a professional looking Powtoon video from a not so professional looking one is how you use transitions, animations and positions of objects and characters on the screen.
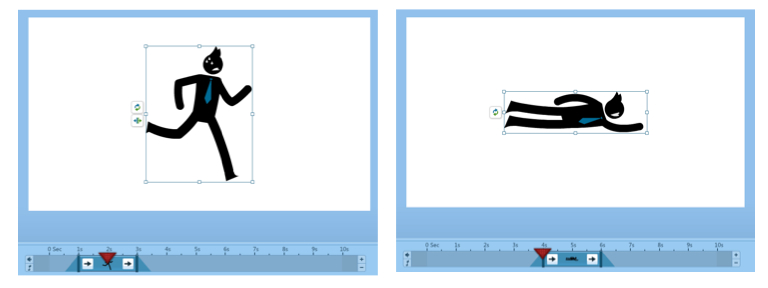
For transitions between scenes try to make the exiting transition and entering transition match up. For example, if you make everything leave the scene by exiting to the right, then you’ll want to have the next scene enter
from the left. This will create a nice flow from one scene to the next. It’s also a good idea to leave about half a second to one second in between the transitions. So set your next scene to enter the shot about a half second or one second
after the previous scene has exited. This will give you a smooth looking transition from one scene to the next.

And finally, the positioning of your objects should have a realistic perspective. What this means is that if you want something to look like it’s far away from the viewer, place it up higher on the screen. If you want something
to appear closer, place it lower on the screen. But also be sure to adjust the object’s size so that something far away is smaller and something close is bigger.

Tip #8: What’s Your Character? (aka Your Target Market)
Those awesome Powtoon people have given us a bevy of characters to choose from. There’s pretty much something for everyone and you may be tempted to mix and match characters.
My advice is to choose one set of characters for your video and stick with that set for that video. This helps create visual continuity and makes it easier for your audience to identify with the characters.
And that’s really key. The character set you choose should somewhat represent your target market. For example, if your target market is parents of young children, don’t use the corporate looking characters.
I realize that it’s a really obvious thing when you hear me say it, but I’ve seen plenty of videos where the mixing and matching just doesn’t give a professional look.
I will say, however, that if a character set represents a certain type of person that is a contrast to another character set, then go for it. For example, one character could be someone who has never used your product, and the
other character could be someone who has.

Tip #9: Images Rule – Why & Tips for Using Images
Images say a lot about your company, your brand and you. Images can be used as a background, to show your product or service, or they can be used to represent an idea or help make your message more clear.
And Powtoon makes it easy to add images to your videos. You can choose from the large selection of illustrations, which are fantastic and usually all you need. Or you can choose photos using Powtoon’s photo search
function. And finally, you can upload your own images, like your company logo.

The key thing to remember when uploading your own photos and illustrations is the size of your images. For the size, I recommend images to be at least 900 pixels wide. This will help the image maintain its quality even if you have to
make it bigger in the video. Images that are smaller tend to look pixelated and just plain crappy and unprofessional if they’re made bigger on screen.

Tip #10: Setting the Mood – Choosing Background Music
Background music is an essential part of your Powtoon video and Powtoon offers lots of great music for your project. Whatever you choose, set the volume with the slider control so the music isn’t too loud if you have a voiceover. The music should
complement, not overpower your voiceover. If you don’t have a voiceover, then set the music volume to max. Personally, I like using the Powtoon background music but I also want to have options. A great place to get free, copyright free music is
YouTube. Log into your YouTube account, click on your profile and select Creator Studio. On the lefthand side of the screen you’ll see a section at the bottom called Create. Clicking on Create will take you to YouTube’s Audio Library where you can choose
from hundreds of different audio tracks and sound effects.


You’ll also see that YouTube has free music and ad-supported music. Both types of music can be used for any type of project, but the ad-supported music has restrictions. The most common restriction is that you can’t monetize your video with YouTube advertising. The other restriction is
the song will be blocked in certain countries. My advice is to stick to the free music since you are making Powtoon videos for business purposes. I’m not a legal expert but it’s probably safer to not use copyrighted music in your video. Once you choose something, download it to your
computer and upload it to Powtoon. Easy.
Bonus Tip #1: Add an Extra Shot of Pow
Once I finish editing my video in Powtoon, I export the video file and do a bit of extra editing on my computer. This lets me add some finishing touches like a fade in and fade out effect. You can also use your video editor to add video to your Powtoon that you shot with a video camera, which is something I do quite often.

Another thing I often do is add my background music in my video editor, instead of in Powtoon. And I do this because it lets me separately adjust the volume of my voiceover or background music. It also lets me easily change the background music without having to re-export my file from Powtoon.
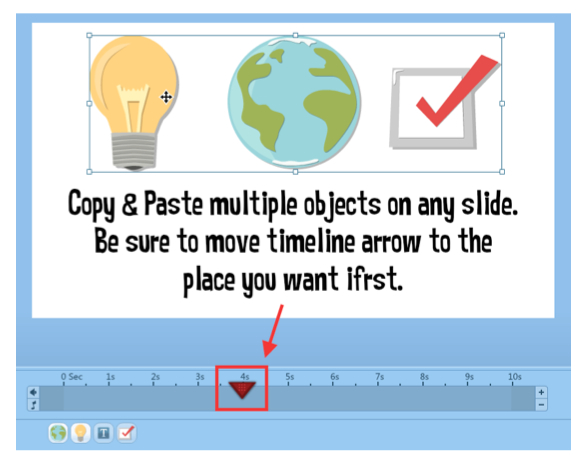
Bonus Tip #2: Copy & Paste is Your Friend
After I finish with my storyboard and begin editing the video, there are a lot of times where I’ll want to fit a scene from, for example, the second slide into the first slide. Or I may have to move something from one slide to the next slide because it doesn’t fit due to timing.
An easy way to make this move is to select the thing I want to move, copy, then paste it. Just be sure to place the red timing arrow at the place you want your pasted object to appear.
And if there are a few objects in a scene that need to be moved, click on each object while holding down Command if you’re a Mac user, or Control if you’re on a PC. Once you’ve done that, click Copy to copy all of those objects at once. Then just paste them wherever you want them.
Just be sure to double check the animation effect of your pasted object or objects, because sometimes the effect can be changed after pasting.
Summary
Congratulations! You made it to the end of the Top 10 Pro Tips to Create Powtoons with Pow for Business Owners! You’ve learned all this…
Expectations – What Powtoon Is and What Powtoon Isn’t
Script Writing Essentials
How Long Should My Powtoon Be?
To Voice or Not to Voice?
Storyboard – Why & Basic Tips
Size Matters – Creating Emotion with Size
Transitions, Animations & Positions – Smooth Moves Create Flow
What’s Your Character?
Images Rule – Why & Tips for Using Images
Setting the mood – Choosing Background Music
Bonus Tip #1: Add an Extra Shot of Pow
Bonus Tip #2: Copy & Paste is Your Friend
Applying what you have learned in this guide will elevate your Powtoons to a new level. At the very least, you’ll create a much more professional impression for your business.
The Next Step
MAKE A VIDEO! Once you’re done, I’d love to see it and hear about your experience so get to work!
The Next, Next Step
Content marketing using video is one of the best ways to build your brand and get the word out about your business. If you’re ready to take that next step, I’m here to help you create that content and get it out there for you.
Or maybe you tried making your own Powtoon and realized there are better ways to spend your time, but that you still see the value in using videos for your business. If that’s you, I’m here to help you bring your message to your market.
Happy Powtooning and much success!
This is a guest post written by Powtoon Professional Carl Kwan:
Carl Kwan, MBA is an expert in training and consulting, presentations, persuasive storytelling, presentation design, and video marketing.
He is an experienced and professional voice over artist, a Korea Business central ambassador, and was a TV host on Korea’s Educational broadcasting system.
For more information on Carl Click Here or personally contact him at carol@carlkwan.com

Latest posts by Jordana Pepper (see all)
- The Most Creative Teacher Is… - October 22, 2015
- How To Make Marketing Videos People Will Really Love & Share! - April 28, 2015
- Digital Marketing in 2015 - March 15, 2015
- 5 Steps to Overcoming Stage Fright - March 2, 2015